Hi Folks,
Mark your calendars: Registration for Fall leisure classes will open Monday, January 11th and classes will start on Tuesday, January 19th, after the Dr. Martin Luther King, Jr. holiday.
I will be teaching Beginning Throwing Thursdays 5-7 PM for those new to making pots on the wheel, and an intermediate throwing course Tuesdays 5-7 PM for those who have already taken Beginning Wheelthrowing or equivalent.
Both courses are 7 weeks long and end just before spring break.
Cheers,
Jay
Tuesday, December 15, 2009
Tuesday, November 24, 2009
Artisan's Guild Gallery

Before you leave Gainesville for the holidays, make sure you check out the Artisans' Guild Galley. I stopped by a few weeks ago, and they were packed to the rafters with some great handcrafted items. At least two Arts and Crafts Center teachers (Feral Wilcox and Mary Ann Bonner) have work on display there.
The Artisans' Guild Gallery is located Millhopper Square between Leonardo's Pizza and Alternatives.
They will be having their annual holiday open house Sunday, November 29, 12 noon to 5 PM.
Pottery books and periodicals

I moonlight as a librarian, so I'd be remiss if I didn't post something about my favorite pottery books and magazines. Most of these items are available at the Architecture and Fine Arts Library on the UF campus.
Pottery form by Dainel Rhodes
Rather poetic book on making pots. This is one of the first books I picked up when I started to make pots on the wheel, and I found it very inspiring as a beginner- still holds up, even 15 years later.
Thrown pottery techniques revealed : the secrets of perfect throwing shown in unique cutaway photography by Mary Chappelhow
Very well illustrated book how-to book. Very thorough treatment of technique; Ms. Chappelhow gives something like 6 different ways to center the clay. Photos show cut-away shots of hand positions while throwing.
Studio potter
This is the academic journal of studio pottery. Each issue is dedicated to a particular issue of concern to studio potters. Published quarterly.
Ceramics monthly
Glossy monthly magazine for anyone interested in pottery, and ceramic art. Lots of ads, but they're sometimes the best part.
Ann Lindell & Jay Wiese holiday sale
 Ann Lindell and I will be hosting a Holiday show and sale of our work at Ann's home studio on Dec. 6
11:00a – 3:00p.
6305 NW 37 Drive, Gainesville (Mile Run)
Ann is the head of the Architecture & Fine Arts Library at UF and has earned a Master of Fine Arts in ceramics from Washington University in St. Louis.
Wednesday, November 18, 2009
Places to buy and sell pottery online
Here are two places online where you can see what other people are making and how much they're charging for it:
Etsy is a website where hobbyists and professionals alike can offer work for sale online. There's very wide range of quality, styles and prices for pots here. Also some jewelry and non-functional items.
Akar features higher-end work by well-respected ceramic artists and potters.
Simon Leach and his brother John both have online sales galleries (Simon is in Spain, John is in the UK):
Simon Leach Ceramics
John Leach's Muchelney Pottery
Cheers,
Jay
P.S. you can see my work on my Etsy store and on my Flickr site
Last days for making pots in the Arts & Crafts Studio
Hi Folks,
Here are the official last days for making & finishing pots in the Arts & Crafts Studio at the Reitz Union:
Nov. 25: Last day for working with wet clay
Dec. 2: Last day to work with leatherhard clay
Dec. 9: Last day to bisque (work must be *bone dry* to make it in this firing)
Dec. 15: Last studio firing
Dec. 16: Last glaze firing
Dec. 18: Last day to pick up your pots
The ACC studios will be closed from Dec. 19 through Dec. 3
Tuesday, November 3, 2009
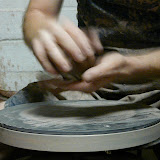
Stages of a mug or cylinder
Take a look at this set of photos of the stages of a mug or cylinder. I've broken the whole process down and made cross-section photos showing where I put my fingers at each stage:
If you haven't done so already, for your 2-hour practice session this week, throw 8 1-pound mugs & keep the best two; we'll cover adding handles in class on November 5 .
-Jay
 |
| Beginning wheelthrowing |
If you haven't done so already, for your 2-hour practice session this week, throw 8 1-pound mugs & keep the best two; we'll cover adding handles in class on November 5 .
-Jay
Friday, October 9, 2009
Mug Handles (Beginning Throwing week 5)
 http://www.flickr.com/photos/divemasterking2000/ / CC BY 2.0
SIMON LEACH - handling of the mugs
Video of Simon Leach pulling handles for mugs
demo notes mugs & handles.pdf
Step-by-step instructions for throwing mugs and pulling handles
Sunday, October 4, 2009
How to make the most of your practice time

The key to learning to throw is to practice making pots -lots of pots. In addition to our 2-hour class meetings, it's a good idea to spend another two hours each week practicing on your own. During this practice session, I recommend that you throw at least 8 pieces of clay and keep 2. If you practice this way for two hours each week (in addition to class time), you'll be making pots better, faster, more accurately, and you'll find the whole process much more fun.
Here's how practice looks:
First, decide what shape you're going to make. Commit to this shape; if you decide to make a mug and it ends up looking more like a bowl, don't settle for what you get. You can do better!
Next, take about 15 minutes to set up your wheel & tools, & to wedge, weigh, & knead your clay.
You'll need 4 1-lb. balls of clay, wedged & kneaded. Tools should include the following:
- bucket 1/2-full of water
- 4 bats
- towel
- sponge
- throwing stick
- wire
- needle
Then, throw each ball of clay. Spend no more than 10 minutes per piece of clay. This is very important, for 2 reasons: #1, the top layer of the clay will get too wet and sticky to work with after about 10 minutes, and #2, the more time you take, the less you make.
When a piece collapses while you're working on it, don't try to rework the same piece of clay; You'll have better results if you cut it off with your wire and start over with a fresh ball of clay. Also, instead of smooshing up the collapsed piece of clay right away, set it aside as-is, and let the surface water dry off a bit first.
When you're done with all 4 balls of clay, WALK AWAY. Take a 5-minute break; don't touch anything. Seriously, don't touch it! Get a cup of coffee, make a phone call, do some yoga, etc. This is so you can look at the pieces you've made with a fresh eye, and to give yourself some psychological distance from your pots.
Here's the hardest (and most important) part:
After a 5 minute break, come back and take a look at the 4 pots you've made. Set the best one aside to keep- and smoosh up the other 3. I know; at this point, a finished pot can seem like a miracle and smooshing it up is probably the last thing you want to do. It's easy to become so attached to all of the effort and struggle that you've put into the surviving pieces that it almost seems like murder, but you gotta rip that Band-Aid off. Besides, if you know at the outset there's 75% chance you'll end up smooshing up the piece anyway, maybe you can worry a little less about wrecking the piece that you're throwing. This is supposed to be fun & relaxing, right?
Incidentally, before smooshing, it can be helpful to cut each piece in half from top to bottom. This will reveal the cross section, and you'll be able to easily spot unevenness, thick/thin bottoms, and other trouble areas.
So, your 2 hours is about half over at this point. The second half of practice is to throw 4 more balls of clay, then clean up.
Next, wedge the smooshed pieces back up with the rest of your clay. It'll look like the clay's way too wet, but trust me, it's not; that's mostly surface water. After a couple of minutes of wedging, the clay won't seem so sticky anymore.
Weigh out & knead 4 lbs of wedged clay, then cut it into 4 1-lb. pieces.
Then, throw each ball of clay same as before: Spend no more than 10 minutes per piece of clay; cut off collapsed pieces right away; walk away for 5 minutes when you're done with all 4 pieces; keep the best one & smoosh up the other 3.
Finally, take about 10 minutes to finish up: wrap up the pieces you've kept and put them on the class shelf; bag up your clay, clean off tools & wheel &c.
So, to recap, your 2-hour practice time should look something like this:
Set-up & clay prep: about 15 minutes
throw 4 balls of clay: 20-40 minutes
take a break & wedge clay: about 10 minutes
throw 4 balls of clay: 20-40 minutes
take a break & clean-up: about 15 minutes
Any remaining time you can use to glaze, soften or reclaim clay, pull handles, finish leatherhard pots, clean up greenware, etc.
At the end of your 80-120 minutes, you should have 2 pieces to keep and a bag of nice soft clay.
One last thing: it's not going to be frustrating forever; if you don't give up, at some point it really is fun! My take on it is that if it was easy, it wouldn't be worth doing.
Keep practicing!
Saturday, October 3, 2009
Mugs: Beginning Throwing week 4
Simon leach throws mugs: http://www.youtube.com/watch?v=A7v_s7kL-Jg
For your 2-hour practice this week, throw 8 mug bodies and keep the best 2.
Next week, we'll look at how to make handles for your mugs.
See you next Thursday!
-Jay
For your 2-hour practice this week, throw 8 mug bodies and keep the best 2.
Next week, we'll look at how to make handles for your mugs.
See you next Thursday!
-Jay
Monday, September 28, 2009
Notes on Glazing (Beginning Throwing Week 3)
Hi folks,
No videos this week, but below is a PDF document with some notes on glazing your pots. Remember to wax the bottom!:
Notes on glazing
During 2-hour practice this week:
Next class, we'll look at making mugs on the potters wheel.
Cheers,
Jay
No videos this week, but below is a PDF document with some notes on glazing your pots. Remember to wax the bottom!:
Notes on glazing
During 2-hour practice this week:
- Finish leatherhard bowls from last week & put on shelf to dry
- Finish bone-dry bowls & put on "ready to bisque" cart
- Glaze any bisque pots & put in kiln room for glaze firing
- If you have time, practice making bowls on the wheel (throw 8 1-pound pieces of clay, keep 2)
Next class, we'll look at making mugs on the potters wheel.
Cheers,
Jay
Friday, September 18, 2009
Beginning Throwing, week 2: throwing & finishing bowls
One resource & one tip this week:
Resource:
SIMON LEACH - how to quickly finish & fettle mugs (YouTube)
This is how English potter Simon Leach finishes mugs. Pay special attention to how he "thumbs off" the bottoms of his mugs (starting at 3 minutes and 30 seconds); we'll be doing the same thing to the bottom of our bowls.
Tip:
Drying and finishing your pots
Next week we'll talk about:
Cheers,
Jay
Resource:
SIMON LEACH - how to quickly finish & fettle mugs (YouTube)
This is how English potter Simon Leach finishes mugs. Pay special attention to how he "thumbs off" the bottoms of his mugs (starting at 3 minutes and 30 seconds); we'll be doing the same thing to the bottom of our bowls.
Tip:
Drying and finishing your pots
- Let piece stiffen on the bat (or use hair dryer)
- As soon as the piece is stiff enough to handle without distortion, flip it over so the bottom can dry
- Dry slowly; wrap in plastic to keep moist (newspaper square top and bottom)
- Remember to label your piece with your name and the date while it's on the shelf
- When piece is leatherhard (about the hardness of cheddar cheese):
- Tap the bottom so it bulges inward slightly
- Thumb the bottom edge
- Write your name and the date on the bottom with a stylus
- Put the piece back on the class shelf (unwrapped) until it is bone dry
- When piece is bone dry:
- clean up rough spots with a metal rib or fettling knife and a damp sponge
- put the piece on the "to bisque" shelf for bisque firing
Next week we'll talk about:
- glazing and decorating
- softening clay
- reclaiming clay
Cheers,
Jay
Friday, September 11, 2009
Wedging, kneading & centering practice
Hi folks,
Great first class!
For your 2 hours of practice time this week, please attempt to center 8 1-pound balls of clay by next class:
Please refer to the last blog post for notes and videos on wedging, kneading, & centering.
If you kept a piece you made during class, unwrap it during your practice time so it has a chance to dry a bit. Remember to wrap it back up, label it with your name, and put it back on the shelf before you leave.
Next class, we'll look at the rest of the throwing process, and how to finish a bowl.
Cheers!
Jay
Great first class!
For your 2 hours of practice time this week, please attempt to center 8 1-pound balls of clay by next class:
- Wedge all of your clay
- Weight out 4 lbs of wedged clay & knead it;
- Divide kneaded clay into into 4 1-lb balls;
- Center each ball of clay (you may try to shape it into a bowl if you like);
- When you've centered all 4 pieces of clay, wedge them back up with the rest of your clay and repeat this whole process 1 more time
Please refer to the last blog post for notes and videos on wedging, kneading, & centering.
If you kept a piece you made during class, unwrap it during your practice time so it has a chance to dry a bit. Remember to wrap it back up, label it with your name, and put it back on the shelf before you leave.
Next class, we'll look at the rest of the throwing process, and how to finish a bowl.
Cheers!
Jay
Thursday, September 10, 2009
Beginning Throwing Fall 2009 first class
Hi Folks,
Here's what we'll be doing for the first class:
Here are some resources that might help get you going. Please take a look at them some time this week:
Video of English potter Simon Leach on how to knead your clay using the spiral method. This is a bit different from the method we practiced in class, but the general principle is the same.
Wot kneading again!
Video of English potter Simon Leach kneading from a different angle.
Tips on centering
Video of English potter Simon Leach on how to center your clay
demo notes: wedging
Step-by-step notes on how to wedge and knead your clay (Adobe PDF).
Here's a video of Simon Leach making a bowl from beginning to end:
SIMON LEACH - Close up - GP bowl !!
Cheers,
Jay
Here's what we'll be doing for the first class:
- Waivers & name tags
- Introductions
- What we'll be making: Bowls, mugs & bud vases
- Get clay & rent a locker
- Wedging & kneading demo & practice
- Centering demo & practice
- Practice session sign-up
Here are some resources that might help get you going. Please take a look at them some time this week:
A closer look at kneading
Video of English potter Simon Leach on how to knead your clay using the spiral method. This is a bit different from the method we practiced in class, but the general principle is the same.
Wot kneading again!
Video of English potter Simon Leach kneading from a different angle.
Tips on centering
Video of English potter Simon Leach on how to center your clay
Step-by-step notes on how to wedge and knead your clay (Adobe PDF).
Here's a video of Simon Leach making a bowl from beginning to end:
SIMON LEACH - Close up - GP bowl !!
Cheers,
Jay
Friday, July 31, 2009
Last day for Summer B in Arts & Crafts Center is Aug. 7
Hi Folks,
Please have your pots finished & by the end of next week (August 7); the Arts & Crafts Centers studios will be closed from August 8 through August 23. The studios will re-open when the Fall semester begins on August 24.
Cheers,
Jay
Please have your pots finished & by the end of next week (August 7); the Arts & Crafts Centers studios will be closed from August 8 through August 23. The studios will re-open when the Fall semester begins on August 24.
Cheers,
Jay
Friday, July 24, 2009
Registration for Fall leisure courses begins Aug. 21
Hi Folks,
Mark your calendars: Registration for Fall leisure classes will open August 21st and classes will start on Tuesday September 8th, after the Labor Day holiday.
Cheers,
Jay
Mark your calendars: Registration for Fall leisure classes will open August 21st and classes will start on Tuesday September 8th, after the Labor Day holiday.
Cheers,
Jay
Monday, July 20, 2009
Notes on glazing (Bowls week 3)
Hi folks,
Hope you enjoyed the course! Please take a look at the list of leisure courses next semester- there's a lot more to learn!
Below is a PDF document with some notes on glazing your pots. Remember to wax the bottom!:
Notes on glazing
Cheers,
Jay
Hope you enjoyed the course! Please take a look at the list of leisure courses next semester- there's a lot more to learn!
Below is a PDF document with some notes on glazing your pots. Remember to wax the bottom!:
Notes on glazing
Cheers,
Jay
Last bowls class tomorrow night (Tuesday 7/21/2009 5 pm)!
Remember, the next (and final) bowls class starts at 5 pm tomorrow night (7/21/2009)
What we'll be doing:
Jay
What we'll be doing:
- Glazing your pot;
- Making bigger bowls and other shapes;
- Directions for the future
If you can, please come in early so you can have your clay ready to throw by 5.
Don't forget your towel!
Cheers,Jay
Thursday, July 16, 2009
Bowls class week 2 notes & video
One resource & one tip this week:
Resource:
SIMON LEACH - how to quickly finish & fettle mugs (YouTube)
This is how English potter Simon Leach finishes mugs. Pay special attention to how he "thumbs off" the bottoms of his mugs (starting at 3 minutes and 30 seconds); we'll be doing the same thing to the bottom of our bowls.
Tip:
Drying and finishing your pots
For your two-hour practice session this week, make at least four bowls. Keep the best bowl, and recycle the others.
Next week is our last class. We'll talk about:
Cheers,
Jay
Resource:
SIMON LEACH - how to quickly finish & fettle mugs (YouTube)
This is how English potter Simon Leach finishes mugs. Pay special attention to how he "thumbs off" the bottoms of his mugs (starting at 3 minutes and 30 seconds); we'll be doing the same thing to the bottom of our bowls.
Tip:
Drying and finishing your pots
- Let piece stiffen on the bat (or use hair dryer)
- As soon as the piece is stiff enough to handle without distortion, flip it over so the bottom can dry
- Dry slowly; wrap in plastic to keep moist (newspaper square top and bottom)
- Remember to label your piece with your name and the date while it's on the shelf
- When piece is leatherhard (about the hardness of cheddar cheese):
- Tap the bottom so it bulges inward slightly
- Thumb the bottom edge
- Write your name and the date on the bottom with a stylus
- When piece is bone dry, clean up rough spots with a metal rib and a damp sponge
For your two-hour practice session this week, make at least four bowls. Keep the best bowl, and recycle the others.
Next week is our last class. We'll talk about:
- Glazing
- Big bowls (and other shapes)
- What to do for the rest of the semester
Cheers,
Jay
Tuesday, July 14, 2009
Bowls: 2nd class (7/14/2009 at 5 pm)
Hi Folks,
Remember, the next bowls class starts at 5 pm tonight (7/14/2009)
Please remember to bring a small towel.
If you can, try to come in early and get your clay weighed, wedged, and kneaded before class starts.
Even better, come in *very* early and get some practice!
Cheers,
Jay
Remember, the next bowls class starts at 5 pm tonight (7/14/2009)
Please remember to bring a small towel.
If you can, try to come in early and get your clay weighed, wedged, and kneaded before class starts.
Even better, come in *very* early and get some practice!
Cheers,
Jay
Friday, July 10, 2009
Learning Curves
Even though this article by outdoor adventurer and author Mark Jenkins is about mountain climbing, karate, and and cross county skiing, it nicely sums up the right way to approach making pots on the wheel:
Learning Curves
From page 5:
Learning Curves
From page 5:
Here's a rule I try to remember: Rushing is almost always wrong. Rushing robs you of the charm of the moment. To rush is to have your mind always out ahead of your body, which is so unnatural that stupid mistakes are inevitable. The opposite of hurrying is not slow, but swift. To be swift you must be efficient. Efficiency in the outdoors is a form of mindfulness. It's about focus and having the knowledge and ability to make the right moves—and that requires experience, which, alas, takes time.
Wednesday, July 8, 2009
Bowls, Week one: wedging, kneading & centering
Hi folks,
First class was a bit overwhelming, eh? Don't worry, it gets easier- as long as you practice! For your 2 hours of practice time this week, please attempt to center 8 1-pound balls of clay by next class.
Remember to wedge and knead your clay- you can either knead each 1-pound piece by itself, or you can knead all 4 pounds at once before dividing into 4 pieces.
Below are some resources to help get you going:
Video of English potter Simon Leach on how to knead your clay using the spiral method. This is a bit different from the method we practiced in class, but the general principle is the same.
Wot kneading again!
Video of English potter Simon Leach kneading from a different angle.
Tips on centering
Video of English potter Simon Leach on how to center your clay
demo notes wedging.20080912.pdf
Step-by-step notes on how to wedge and knead your clay (Adobe PDF).
Here's a video of Simon Leach making a bowl from beginning to end:
SIMON LEACH - Close up - GP bowl !!
Cheers,
Jay
First class was a bit overwhelming, eh? Don't worry, it gets easier- as long as you practice! For your 2 hours of practice time this week, please attempt to center 8 1-pound balls of clay by next class.
Remember to wedge and knead your clay- you can either knead each 1-pound piece by itself, or you can knead all 4 pounds at once before dividing into 4 pieces.
Below are some resources to help get you going:
A closer look at kneading
Video of English potter Simon Leach on how to knead your clay using the spiral method. This is a bit different from the method we practiced in class, but the general principle is the same.
Wot kneading again!
Video of English potter Simon Leach kneading from a different angle.
Tips on centering
Video of English potter Simon Leach on how to center your clay
Step-by-step notes on how to wedge and knead your clay (Adobe PDF).
Here's a video of Simon Leach making a bowl from beginning to end:
SIMON LEACH - Close up - GP bowl !!
Cheers,
Jay
Friday, March 20, 2009
Bowls (week 7)
SIMON LEACH - back to basics - GP bowls !
Simon Leach makes bowls very similar to ours. Note his technique for lifting the bowl off the wheel with his fingers. 450 grams is about 1 pound, and 15 centimeters is about 6 inches, by the way.
Bowlworkingdrawing.pdf
Working drawing of this week's bowl, with dimensions and clay weight (Adobe PDF document)
Wednesday, March 18, 2009
Cream pitcher (Week 6)
SIMON LEACH - Jarras pequeñas(sm pitchers)
Simon Leach throws a pitcher very similar to ours- in Spanish! ¡Hasta la proxima video clip!
Cream pitcher working drawing & demo notes
Adobe PDF file; Actual size drawing with weights and dimensions to print & bring with you to the studio
-Jay
Simon Leach throws a pitcher very similar to ours- in Spanish! ¡Hasta la proxima video clip!
Cream pitcher working drawing & demo notes
Adobe PDF file; Actual size drawing with weights and dimensions to print & bring with you to the studio
-Jay
Friday, February 27, 2009
Plates video and drawing
SIMON LEACH - throwing a plate
Simon Leach throws a plate. Bowly!
SmallPlate.pdf
Actual-size working drawing with measurements and demo notes for a small plate
Simon Leach throws a plate. Bowly!
SmallPlate.pdf
Actual-size working drawing with measurements and demo notes for a small plate
Shop for (and sell) pots online
Here are two places online where you can see what other people are making and how much they're charging for it:
Etsy is a website where hobbyists and professionals alike can offer work for sale online. There's very wide range of quality, styles and prices for pots here. Also some jewelry and non-functional items. Etsy now has "Shop Alchemy" where you can request custom items (click on "shop" under "seller info" for a particular item you like; from click "request custom item").
Akar features higher-end work by well-respected ceramic artists and potters.
Friday, February 20, 2009
Jay Wiese's ceramics
Jay Wiese's ceramics
Here's a set of photos of my recent work (Flickr.com)
(2/27/09 update: I've made these photos public so you shouldn't have to log in to see them. 2/27/09)
Here's a set of photos of my recent work (Flickr.com)
(2/27/09 update: I've made these photos public so you shouldn't have to log in to see them. 2/27/09)
Notes on glazing
Notes on glazing.pdf
Step-by-step instructions on how to glaze your pot. Print this out and bring it with you to the studio. Adobe PDF format.
Step-by-step instructions on how to glaze your pot. Print this out and bring it with you to the studio. Adobe PDF format.
Friday, February 13, 2009
Week 3 resources: mugs
SIMON LEACH - handling of the mugs
Video of Simon Leach pulling handles for mugs
demo notes mugs & handles.pdf
Step-by-step instructions for throwing mugs and pulling handles
Mug, 12 oz.pdf
Working drawing for 1-pound mugs that will hold 12 oz. of coffee (or tea or whatever)
Video of Simon Leach pulling handles for mugs
demo notes mugs & handles.pdf
Step-by-step instructions for throwing mugs and pulling handles
Mug, 12 oz.pdf
Working drawing for 1-pound mugs that will hold 12 oz. of coffee (or tea or whatever)
Sunday, February 8, 2009
Poor Robert!
Hi Folks,
New video from Simon Leach in which Robert discovers the importance of wedging your clay properly:
http://www.youtube.com/watch?v=fYCivQ8UoPc&feature=related
Cheers,
Jay
New video from Simon Leach in which Robert discovers the importance of wedging your clay properly:
http://www.youtube.com/watch?v=fYCivQ8UoPc&feature=related
Cheers,
Jay
Friday, February 6, 2009
Week 2 resources: tumbler
Hi folks,
New shape this week, basically the same techniques as week one:
Tumbler working drawing & notes (Adobe PDF)
Here's the prototype for our tumbler by studio potter Sam Taylor
Please review the videos and handouts from last week's post if you need to.
Cheers,
Jay
New shape this week, basically the same techniques as week one:
Tumbler working drawing & notes (Adobe PDF)
Here's the prototype for our tumbler by studio potter Sam Taylor
Please review the videos and handouts from last week's post if you need to.
Cheers,
Jay
Friday, January 30, 2009
Week one resources
Hi folks,
Thought you might find some these resources helpful:
low cylinder working drawing.pdf
This is an actual-size drawing of the cross-section of the completed cylinder for week one, with dimensions (Adobe PDF).
Project notes cylinder 20090130.pdf
Step-by-step notes on how to throw a cylinder (Adobe PDF).
wedging notes 20090130.pdf
Step-by-step notes on how to wedge and knead your clay (Adobe PDF).
A closer look at kneading (video)
Video of English potter Simon Leach on how to knead your clay using the spiral method
Wot kneading again! (video)
Video of English potter Simon Leach kneading from a different angle.
Tips on centering (video)
Video of English potter Simon Leach on how to center your clay
cross section of cylinder (video)
Video of Simon Leach throwing a cylinder
See you next week!
Cheers,
Jay
Subscribe to:
Posts (Atom)